"If I had a Star for all the times you made me smile,I would Hold the sky in my hand."

Thursday, November 1, 2012

DIY Handmade Eraser Stamps

Hey Bloggy friends!
Over the weekend I saw a picture that inspired me to want to try making my own eraser stamps. What are eraser stamp you ask? Well there exactly what they sound like ( Literally a stamp made from eraser that you crave yourself) there are different kinds of eraser stamps ( some are simple, other are very detailed and intricate and everywhere in between). For my very first eraser stamp I thought I'd keep it simple and see how I like the results.
This is the Pinterest picture that inspired me to make my own eraser stamps! If you have a Pinterest be sure to go follow my craft boards it's really fun to just get inspired there ( My Pinterest button is on the sidebar) be sure to share your craft boards with me as well! 

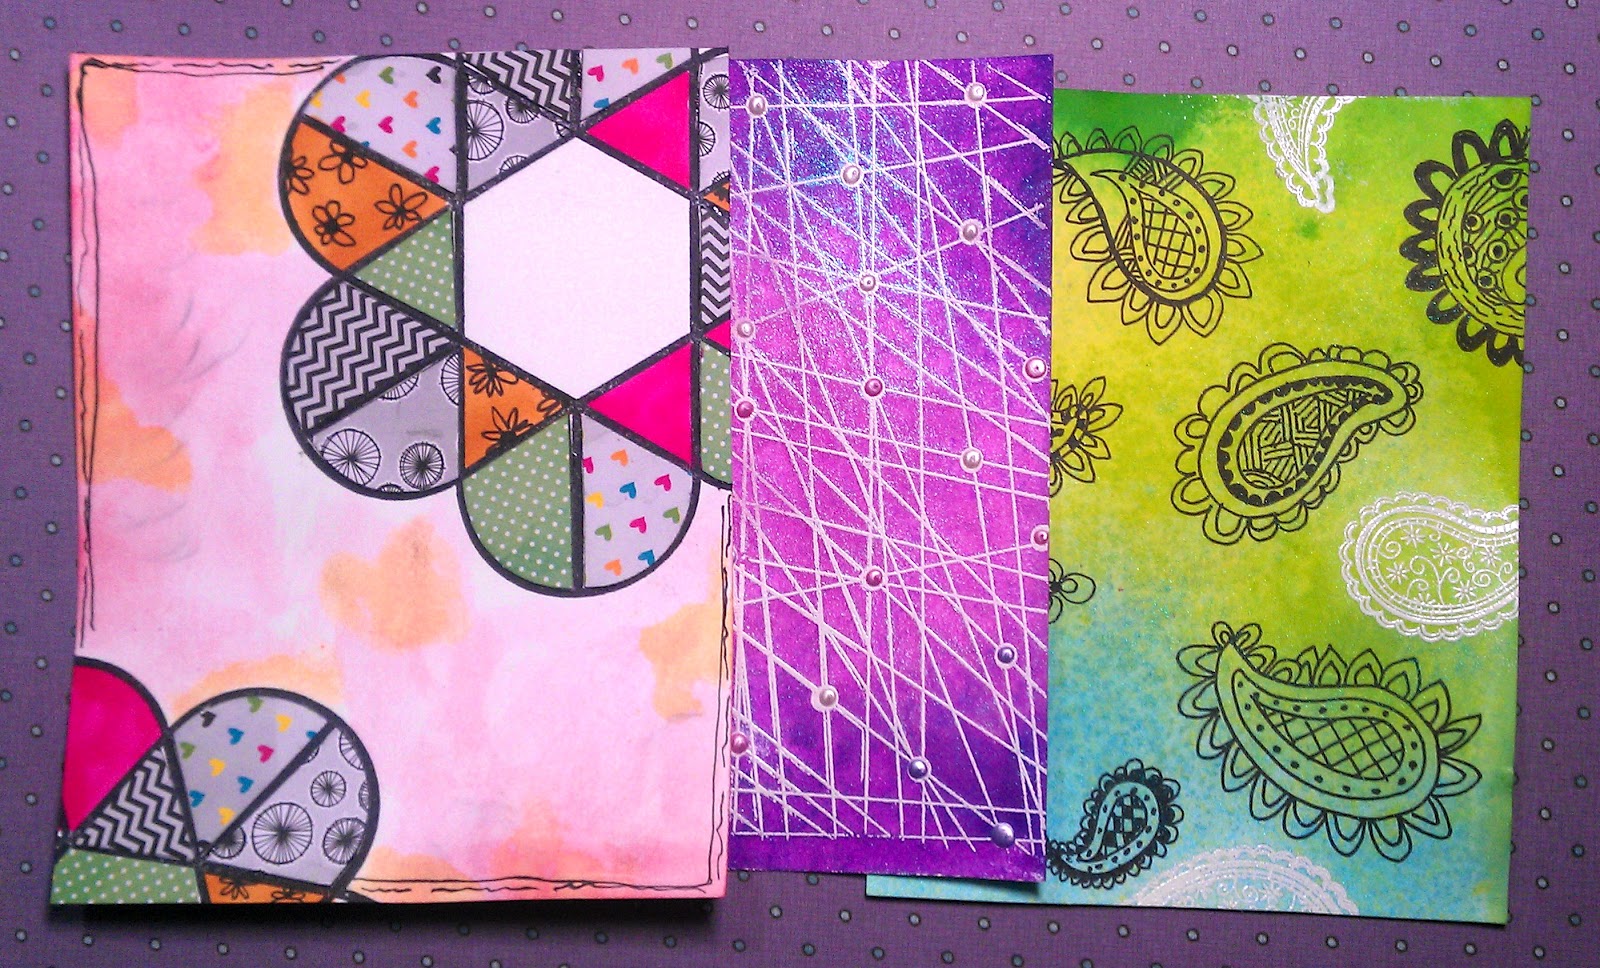
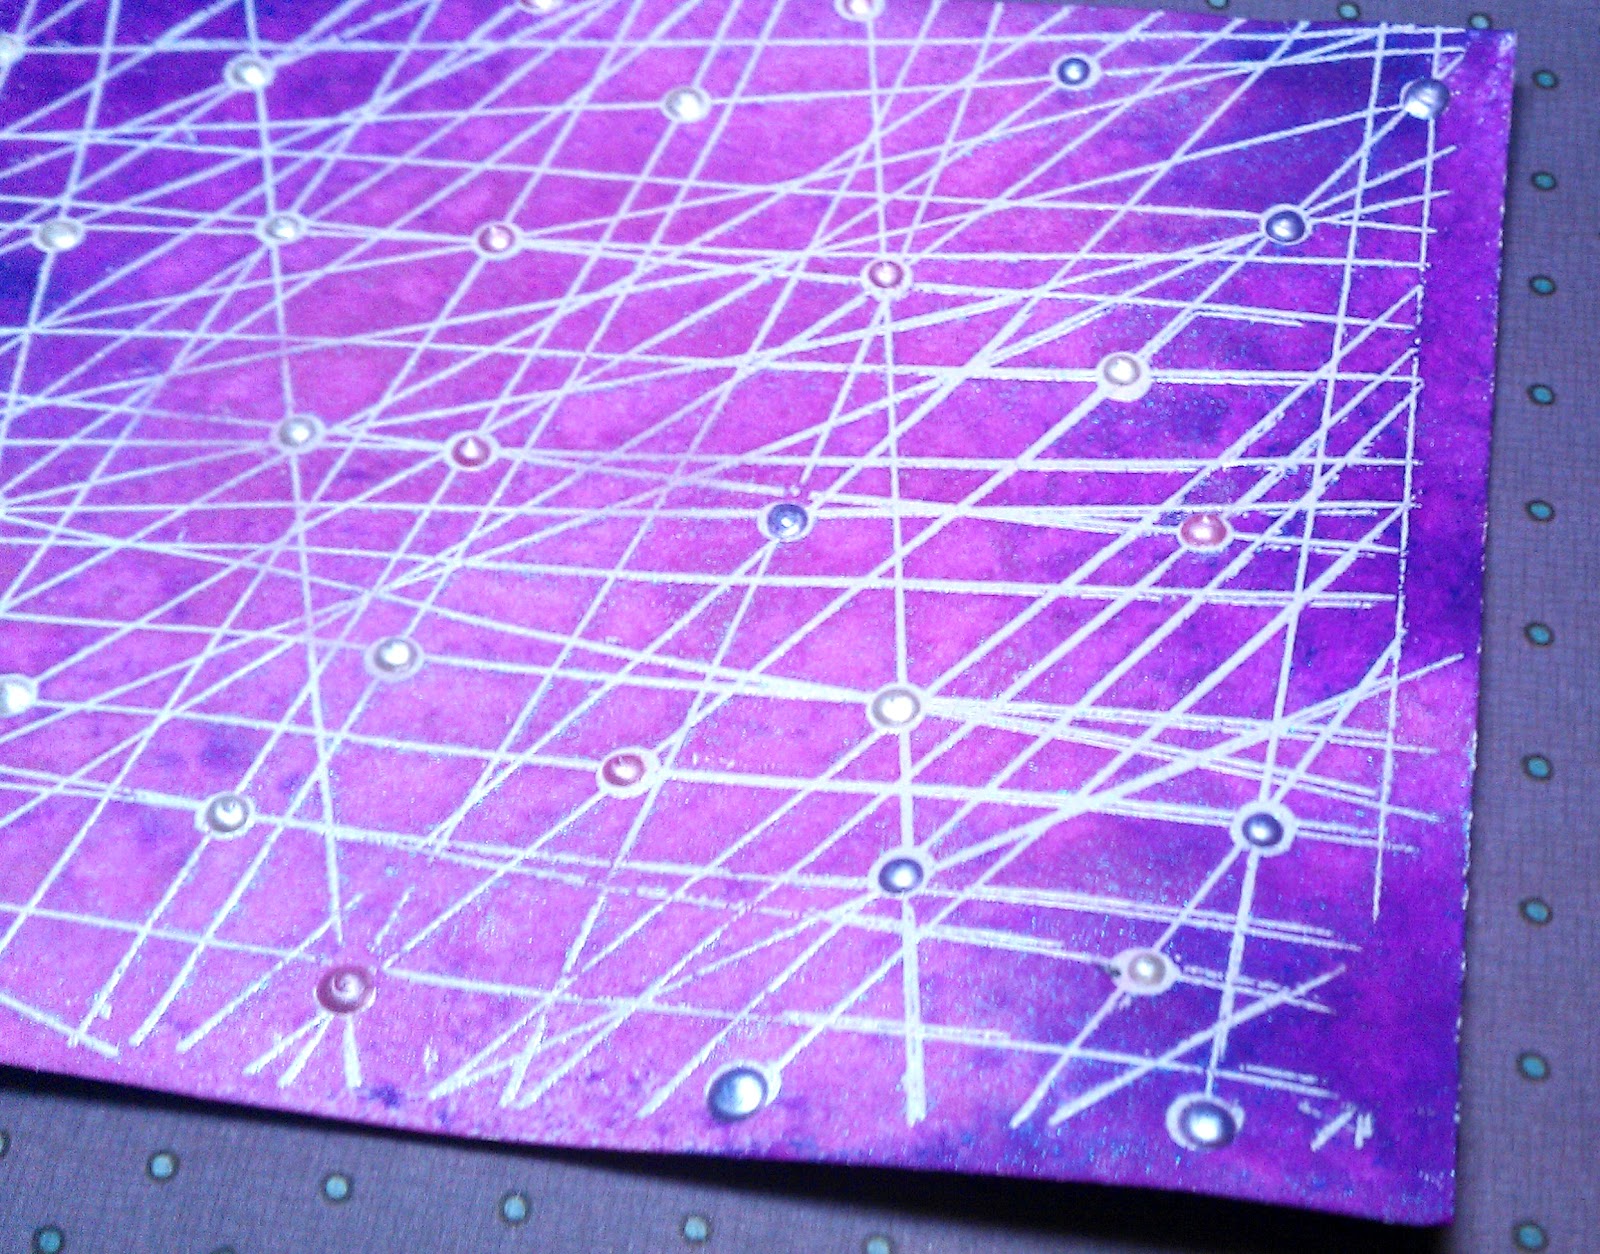
I carved these pencils with a sharp blade and decided on an chevron arrow and tri-angle as the shapes. I used a pen to draw the shapes onto the erasers before I cut, the marks served as a cutting guide. Once I finished cutting,I then inked my stamps with a kaleidoscope ink pad to create fun designs in bright colors.
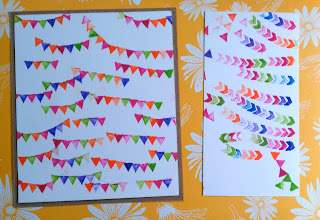
For the paper on the left I created, what I call a " Circus Banner" design which I intend to use for a YT Card tutorial really soon. The chevron arrow design I really love and can totally see using in the future for multiple application such as project life, mini albums and card backgrounds. I'm thinking of  sneaking some of my handmade stamps into future designs and see if anyone you notice? ( I'm in the mood to be sneaky bwahahah) Anyways it was a lot of fun to make my own handmade stamps and try something totally new and maybe I inspired you to make your own.

                                                    Thanks for stopping by!

Saturday, October 27, 2012

You Melt My Heart!


Hey Bloggy Friends!
I'm super excited to share this card with you guys because I think it came out so stink'in cute! I love those little penguins ( Loved dressing them up) from this Some Odd Girl set called winter friends. This wouldn't be my card without a little mix and matching of stamp sets so of course I also used some Lawn fawn on my card for the (Igloo and snowflakes).

Copic markers used on this cute Duo :C2,C4,C6,C8,C10,N1,0- Blender, Beak YR31,YR23. 
For the inside I kept it simple and just added some ribbon.
I hope you guys love this card as much as I loved making it! Thanks so much for stopping by my corner of the bloggy-sphere. :-P  


Products Used:
Inks: Memento (Tuxedo black,London fog, Bahama Blue) Distress inks (Iced Spruce ,Evergreen Bough)( Stamps: Winter friends, Critters in the snow). Cardstock ( Neenah Solar white, American craft) 

Tuesday, October 16, 2012

Say Cheeze

Hey, Friends!
Today is just a quick post to share the card I made for the Challenge over at The Stamp Spot. I've been going a little greeting farm crazy lately ( Cheeky Anya) was one of my first cling mount stamps and lately I've been blessed to get a few retired sets I wanted forever. For this card I took out my 6x6 Amy Tangerine paper pad and played with the patterns. The camera embellie is from the same AT collection but I added some black enamel accents to give it more dimension. 
The strips of paper behind the camera is actually the top part of the paper pad, that normally gets thrown away and I  decided to re-use it ( Much like I do a lot of things lol) and backed it with some yellow American crafts cardstock to really make it pop. 
The actual Polaroid around Miss GF Odetta is from Stamping Bella. I created the background with my copic markers and Odetta is also colored with Copic's. 
(Inside of Card)
 On the inside I used the same AT paper and used my spellbinder circles die to create a writing space.I added a bit of twine on the inside wrapped around the banner.

Thanks for stopping by! Crafty Hugs

Monday, October 1, 2012

"Some Odd Girl" Guest Designer for November and December

Hellooooo!!!! I'm so excited to say that Some Odd girl is having another "Design Team" call which is great for those of us that didn't get a chance to apply to the last one ( I was bummed). Besides the design team call there also looking for guest designer for November and December and getting chosen for either one be soo amazing, I would (no lie) feel like (Sofia Rose from the Ellen show the moment she got to meet Nikki Minja on stage) in case you haven't seen this I'm providing a clip! :-)
Basically I really feel I'd make a great guest designer because I really love my Some Odd girl stamps so I'd be thrilled if I was chosen, I really love to utilize all the elements of the stamp sets  in many different ways and I feel like I could really inspire fellow Oddies with my unique designs and the creative ways I use them in my cards. Below you will find three examples of the cards I've made using my Some odd girl stamps!
                 I hope you like my cards and thank you so much for this amazing opportunity!

Anniversary Card

Hey Bloggy friends!
I hope you all had an amazing weekend because I certainly did. This Sunday my bf and I celebrated our 8yr Anniversary together which was soo much fun! In honor of this amazing occasion I made him a card (Duh lol) which I totally had to share with ya'll because it was inspired by Twlight. This happens to be one of my favorite stamps from Krafting Kimmie ( I love all there Halloween stamps)!
I'm entering this card into the " Show us your Fav challenge" at the KKS blog which I think works just perfectly with my new card, don't you? ;-)
I colored my stamped image with Copic sketch markers and I'm in love with how his cape turned out! I created all the other items on the card besides the flowers which I colored to match the rest of my card. Thanks again for popping by!

Monday, September 17, 2012

Geek is the New Chic!

Hey Bloggy friends! 
I have a super fun card to share with you guys! I finally whipped up a card with one of my new favorite sets called "Preppy Puppies" from Some Odd girl. Let me just warn you now that I will be using this set a ton because it just has so many cute elements too it.. I created the background paper of my card, using  the cute little mustache from this set and achieved the color with mists and distress inks. Can you tell I'm in the mood for Halloween? :-) You can blame the Challenge over at The Stamp Spot for that because it inspired my color palette.

I Colored my geeky puppy with my Copic Sketch markers and wanted to keep him on the tanner side. To make his glasses really dimensional I added (Ranger Enamel gloss Accents) in black and popped them up with some foam mounting tape ( I also added the enamel to parts of the background paper).  Black Metal embellishment's were added for some added interest and to balance out my card. My card layout was inspired by the Challenge over at Some Odd girl ( I just love their Challenges) if you haven't noticed! I hope you get inspired by my card and maybe even join some challenges.... Thanks for stopping by  :-DD 

                                                               Crafty Hugs

Wednesday, September 12, 2012

Sweets for My Sweet!

 Hey Bloggy Friends!
I excited to say I finally got to use my Tiddly Inks stamp set on a card! I made this card for the fabric Challenge over at Designed to Color. I decided to incorporate fabric into my card by making a rolled flower out of T-shirt fabric and the placed some self adhesive pearls in the center. I added some sewing detail on the border of my card with my sewing machine and I just love how it looks! I colored Wryn with my Copic sketch markers and paper pieced her dress with some My Minds Eye.
The Candies are from the same stamp set and they were also Copic Colored and I added some stickles to add a little Bling!
The background paper is by Donna Salazar/GCD studio. I really love wood grain patterns nothing inspires me more than nature ( No surprise though because God is the Ultimate Artist :-) ). I pulled out my Spellbinders Labels one die and did a little bit of die cutting for the background shape.

My rolled Flower with some Pearl Bling! I hope you guys find some inspiration in my card and join some Challenges!

Sunday, September 9, 2012

Creating Your Own Unique Custom Craft Papers!

Hey Bloggy Friends!
I've been a bit busy lately so I haven't posted as much but I thought it was time for a fun tutorial! I really love create my own background papers for my cards ( yes I use designer paper) but every once in a while I like to create something uniquely my own. Whether you want to doodle or feel more comfortable using stamps to create your own custom paper ( I personally enjoy doing both) anyone can really have fun doing this so I hope you enjoy seeing some of my custom papers!
(From left to Right) The first ( and 3rd) papers are a mix of doodles, stamping and paper piecing.While the very Middle paper is just primarily stamping and  embossing. 
To create this paper I used a background stamp from Inkadinkado which I heat embossed using some Stampendous embossing powder in (Detailed White Opaque). The mix of pink and purple was created with some Lindy's Mica powder (Purple Teal) and Rangers Dylusion spray in ( Crushed Grape). I also used Liquid Pearls (White Opal, Petal Pink, Lavender Lace) to create a dimensional affect.
This paper is primarily made of up of my Doodles which I made with my (Copic Multiliners). I did use a stamp to  do some heat embossing in the same white embossing powder I used in the paper ( Above). To create the washed out color affect I used Dylusions ( Cut Grass & fresh lime) and Lindy's (Hydrangea Blue).
I just Adore how this paper came out! I used one of my very favorite stamps on this ( It's one of my fav's because it's so versatile). I decide to do some paper piecing on this custom paper just to show you ways you can incorporate even your designer paper and turn it into something that's still really uniquely your own ( I used some Amy Tangerine paper for this)! I added some of my doodles and did just a bit of Copic coloring ( I outlined the very edge of the paper with my Copic Multiliner). The pink and orange background was created with some Distress inks ( Spun Sugar, Worn Lipstick, Wild Honey), I just used a paint brush and some water for this. I left the very middle of the stamp image blank because I haven't decided yet if I want to cut that piece out and create a window affect for a future card or not. 

I created one extra Custom paper you don't see pictured here ( but will see in my YT video) because I will be using it for my next card post so be sure to check back very soon and I hope this may have inspired to create some of your own paper or even use your designer paper in a new way! Thanks for Stopping by...

Sunday, August 19, 2012

Hello Kitty Sewing Machine!

Hey Bloggy Friends, 
I wanted to share with you my pure excitement because (Drum Roll) I finally have a sewing machine! I got it over this weekend and I've been learning how to use it ever since ( LOL). Now that I finally got the hang of it , I would love to post a video tutorial for people who are more visual learner's like moi! Anyways I  tried to take some detailed pictures so you guys could see the sewing machine itself because I love all things "Hello Kitty"! Ever since I was a little girl , my parents always had to take me to the "Sanrio" store in the mall and ever since then I've been hooked! hehe 
First (2)  Pictures are of the actual box it came in because even that was super cute!
 
(Other Side of Box)
TAA-DA
Secret Compartment for ( Bobbins, Tools, etc)
Cutest Knobs Ever? LOL
The back of  my sewing machine..
It has a handle which is really convenient for moving on and off my desk.
(Different stitch options)
The Right side where I have another Knob and my (On & Off) switch.
Stay tuned for a video tutorial on this lovely sewing machine, I hope you enjoyed seeing the pictures and I can't wait to incorporate some sewing on upcoming projects! Thanks For stopping by... Crafty Hugs

Monday, August 6, 2012

Kaylee Rocks!

Hi everyone! It's Sandra here and today I want to share a card with you using one of my Some Odd Girl Digi stamps; Bicycle Kaylee. I colored up Kaylee with my Copic Sketch markers and printed her out on Neenah; Solar White cardstock. I used  My Mind's Eye paper throughout my whole card and choose a mix of different patterns to play off one another. I really enjoyed incorporating our August Challenge Spots into my card!


I actually did quite a bit of fussy cutting on this card but it was totally worth it! The Leaves on the card are actually from the Some Odd Girl set; Believe ( those are my Go to leaves). Some of the Copic Sketch markers used; Bike V12,V15,V17, Dress YR02,YR04,YR07,W1, Skin YR00,YR000,YR01,BV00,R06,R20, Leaves & Jacket YG11,YG63,YG86.

Don't forget to play along with this month's challenge! :) Can't wait to see all of your lovely creations!

Wednesday, July 25, 2012

Handmade Copic Cubbie!

Hello Crafty friends!
Lately I was really getting annoyed with my current Copic holder aka ( The wicker basket I kept them in) so I decided to make a better solution for myself that would be inexpensive. I kept a large shoe box I had recently acquired and made that the base of my Copic cubbie.
                            I love having my Copic Sketch markers organized by color family.     


I used quite a bit of Washi tape to reinforce the sides and inside shelves. The Shelves themselves are about 4x4 and where cut from heavy weight cardstock. I covered the outside of the box with cardstock designed by Donna Salazar.
 Some of my shelves were sprayed with Glimmer mist on the inside to add some quick color! I actually really love how it turned out so far and I hope you feel inspired to make your own version ? Please feel free to let me know if you need any tips or if you decide to make one ( I'd love to see it) .


                                     Crafty Hugs!

Monday, July 16, 2012

Mixed Media Art Journal "Embrace" Pages

These Mixed Media pages are called "Embrace". I have my art doodles throughout the pages and some stamping.I really enjoyed layering vintage book pages to my background with (Soft Gel Medium) to add texture.
I used a black sharpie and Copic Multi- liner  to draw my art doodles and add small details.
I created that tab with some vintage rubber stamps which I stamped in Memento (Rose bud and Bahama Blue). The twenty-six I created with some saved chain in my stash which was inspired by my recent birthday.( Below is Pt.2 of the video showing me creating these pages to see Pt.1 Click Here.)
                                                                Thanks for stopping by!

Saturday, June 23, 2012

Cloud Coloring Mini Challenge Entry

Hello Again!
This is another entry for different mini challenge over at Some Odd Girl! This challenge was all about making some " Copic Clouds " and it was fun trying this out for the first time. They even have an great  tutorial showing you an easy way to start practicing your own cloud ( totally worth checking out).

I outlined my clouds with Copic Multi liner 0.5  to create a whimsical affect.
                                                Thanks for stopping by!

Rock Royality!

Hey Bloggy friends!
Hope your all having a great weekend and enjoying Facebook Fun Day over at Some Odd Girl. If your crazy enough not to be playing along with them, then your missing out ( hehe). Because I'm having so much fun playing along with there mini challenges! I hope you guys enjoy this card I put together for the " Non Traditional Hair Challenge".
I choose one of my favorite Oddies " Royal " for this card but who am I kidding there all my favorite! The banners behind the sentiment were also stamped from another Some Odd Girl set which I actually rolled the ( mini banners) to create a ribbon like affect. I paper pieced royals dress from a 6x6 paper pad from My Minds Eye. I stamped,embossed and die cut the chandelier from a Hero Arts/Sizzix framelits set.
I really love how Royals funky hair came out! I wanted add just touches of green in her hair for a more " Rock Royality" type of look as I call it, hopefully this will inspire you not to be afraid to play with some color.
(Checkout my Youtube channel to watch me color "Royal" and for the list of Copic's used)
Thanks so much for Stopping by!